精易模块下载地址:https://zhizun.lanzouy.com/inzvBxmtlkf
单一键值对(取出单个value)
{"name": "丁丁","age": 22}
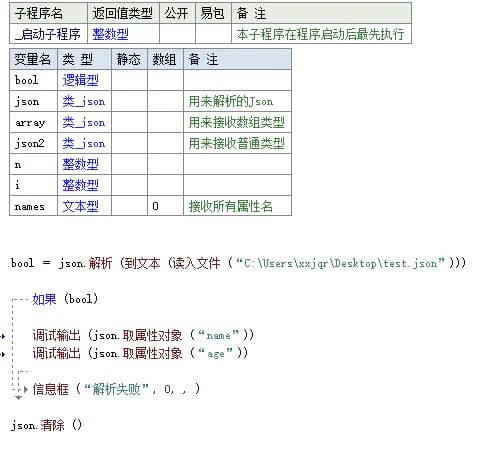
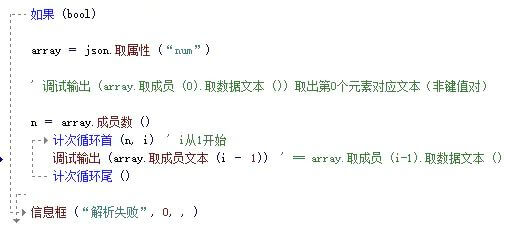
数组之数值(遍历数组中的数值)
{"num":[1,2,3,4]}
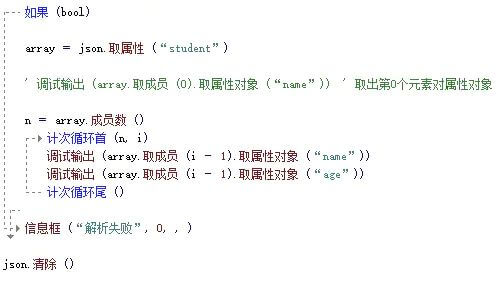
数组之键值对(遍历数组中某个key的value)
{"student": [{"name": "丁丁","age": 22},{"name": "yanyu","age": 20}]}
function ajax(options) {
  var xhr = null;
  var type = 'GET';
  var params = formsParams(options.data);

  if (typeof options.type != 'undefined') {
    type = options.type.toUpperCase();
  }

  //创建对象
  if (window.XMLHttpRequest) {
    xhr = new XMLHttpRequest();
  } else {
    xhr = new ActiveXObject("Microsoft.XMLHTTP");
  }
  if (typeof options.async == "undefined") {
    options.async = true;
  }

  // 设置超时时间(毫秒)
  if (typeof options.timeout == "undefined") {
    options.timeout = 5000;// 例如,5000毫秒(5秒)
  }

    // 设置超时处理函数
    var timeoutHandler = function() {
        xhr.abort(); // 如果超时,则中止请求
        // console.log('Request timed out.');
    };

  // 处理请求成功的回调函数
  xhr.onload = function () {
    if (xhr.status >= 200 && xhr.status < 300) {
      if (typeof options.datatype == "undefined" || options.datatype == "json") {
        if (typeof options.success === 'function') {
          options.success(JSON.parse(xhr.responseText));
        }
      } else {
        if (typeof options.success === 'function') {
          options.success(xhr.responseText);
        }
      }
    } else {
      if (typeof options.error === 'function') {
        options.error(xhr.statusText);
      }
    }
  };

  // 处理请求错误的回调函数
  xhr.onerror = function () {
    if (typeof options.error === 'function') {
      options.error(xhr.statusText);
    }
  };

  // 设置请求头部
  if (options.headers) {
    for (var header in options.headers) {
      xhr.setRequestHeader(header, options.headers[header]);
    }
  }

  // 设置请求方法、URL、是否异步、发送请求
  if (type == "GET") {
    xhr.open(type, options.url + "?" + params, options.async);
    setTimeout(timeoutHandler, options.timeout);// 设置超时
    xhr.send(null);
  } else if (type == "POST") {
    xhr.open(type, options.url, options.async);
    setTimeout(timeoutHandler, options.timeout);// 设置超时
    xhr.setRequestHeader("Content-Type", "application/x-www-form-urlencoded");
    xhr.send(params);
  }

  function formsParams(data) {
    var arr = [];
    for (var prop in data) {
      arr.push(prop + "=" + data[prop]);
    }
    return arr.join("&");
  }
}

// 使用
ajax({
    url: "api.php",// 请求地址
    type: "POST",// 请求方式
    async: true,// 同步:false,异步:true,默认为true
    timeout: 5000,// 设置超时时间(毫秒)
    datatype: "json",// 返回数据的格式,"json","text",默认为json
    headers: {},// 设置请求头部,{"token": "123456"}
    data: {// post数据
        code: "s2sdd",
        link: location.href
    },
    success: function (res) {// 处理请求成功
        console.log(res);
    },
    error: function (res) {// 处理请求错误
        console.log(res);
    }
})
]]>index.wxml
<view>
    <text>{{name}}</text>
</view>
index.js
onLoad:function(options){
 //页面加载完成之后,发送请求获取json数据,options为页面跳转所带来的参数
 var that = this;
 wx.request({
   url: '接口地址',
   method: 'get',
   dataType: 'json',
   data: {id: 1},
   success:function(res){
     console.log(res.data);
     that.setData({
       name: res.data.name
     })
   },
    fail:function(){
      console.log('请求失败');
    }
 })
}
精易模块下载地址:https://zhizun.lanzouy.com/inzvBxmtlkf
单一键值对(取出单个value)
{"name": "丁丁","age": 22}
数组之数值(遍历数组中的数值)
{"num":[1,2,3,4]}
数组之键值对(遍历数组中某个key的value)
{"student": [{"name": "丁丁","age": 22},{"name": "yanyu","age": 20}]}
所以需要手动修改转码即可!
使用php的file_get_contents获取API的json数据,从文件读取的json,js前端传递的json,在json_decode前使用
$json = iconv('gbk','utf-8', $json);
转码,然后再使用json_decode
$arr = json_decode($json, true);
<?php
header('content-type: application/json;charset=utf-8');
$wj = '1.txt';
if (!empty($_POST)) {
    //插入内容,不加FILE_APPEND,默认值为替换内容
    $fp = file_put_contents($wj, $_POST['te'] . "\n", FILE_APPEND);
    if ($fp !== false) {
        echo json_encode(array('code' => '200', 'msg' => '提交成功'));
    } else {
        echo json_encode(array('code' => '400', 'msg' => '提交失败'));
    }
} else {
    if (isset($_GET['te']) && $_GET['te'] == 'hq') {
        //获取内容
        $str = file_get_contents($wj);
        $arr = explode("\n", $str); //把换行转换成数组
        // print_r($arr);
        echo json_encode($arr);
    } else {
        echo json_encode(array('code' => '400', 'msg' => '获取失败'));
    }
}
1.html
<!DOCTYPE html>
<html>

<head>
    <meta http-equiv="Content-Type" content="text/html; charset=UTF-8">
    <meta http-equiv="Cache-Control" content="no-cache">
    <title>PHP利用txt文本存储数据</title>
</head>

<body>
    <input type="text" name="te">
    <button class="btn">提交</button>
    <div class="box"></div>
    <script src="https://libs.baidu.com/jquery/1.11.3/jquery.min.js"></script>
    <script src="https://cdn.jsdelivr.net/npm/sweetalert"></script>
    <script>
        $('.btn').on('click', function() {
            var te = $('[name="te"]').val();
            if (te == '') {
                swal('提示', '请输入内容', 'error');
            } else {
                $.post('1.php', {
                    te: te
                }, function(ret) {
                    if (ret.code == 200) {
                        swal("提示", "提交成功", "success", {
                            buttons: "确定" //,dangerMode: true //确定按钮变红色
                        }).then((value) => {
                            // swal(`The returned value is: ${value}`);
                            if (value) {
                                // swal('确定');
                                location.reload();
                            } else {
                                // swal('取消');
                                location.reload();
                            }
                        });
                    } else {
                        swal('提示', '提交失败', 'error');
                    }
                })
            }
        })
        $.get('1.php', {
            te: 'hq'
        }, function(ret) {
            console.log(ret);
            if (ret.code == 400) {
                swal('提示', ret.msg, 'error');
            } else {
                var str = '';
                for (var i = 0; i < ret.length; i++) {
                    str += ret[i] + '<br>';
                }
                $('.box').html(str);
            }

        })
    </script>
</body>

</html>json_decode(),不加true的话就是面向对象方式获取$b->{'a'}或者$b->a,加了true就是数组方式获取$b['a']!1、获取json数据
$json = '{"a":"sdfgasdg","b":"2","c":"3","d":"4","e":"5"}';
$b = json_decode($json, true);
echo $b['a'];
//结果
sdfgasdg
2、获取api接口的数据
$loc = file_get_contents('http://ip-api.com/json/');
//echo $loc;
$arr = json_decode($loc,true);
echo $arr['countryCode'];
//结果
CN
3、获取js的var值
$str='var lo="北京市", lc="海淀区"; var localAddress={city:"海淀区", province:"北京市"}';
$regex='/lo="(.*?)", lc="(.*?)"; var localAddress={city:"(.*?)", province:"(.*?)"}/is';
preg_match_all($regex,$str,$result);
for($i=0;$i<count($result[1]);$i++){
print_r($result[1][$i]." ".$result[2][$i]." ".$result[3][$i]." ".$result[4][$i]."\n");
}
//结果
北京市 海淀区 海淀区 北京市
4、接收json数据
$data = file_get_contents("php://input");ajax请求本地json
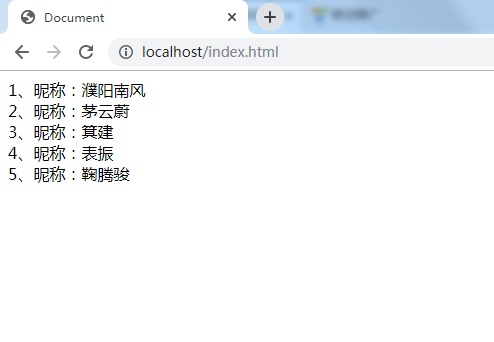
test.json
{
    "data":[
        {"id":"1","nick":"濮阳南风"},
        {"id":"2","nick":"茅云蔚"},
        {"id":"3","nick":"箕建"},
        {"id":"4","nick":"表振"},
        {"id":"5","nick":"鞠腾骏"}
    ]
}
代码:
<!DOCTYPE html>
<html lang="en">
<head>
    <meta charset="UTF-8">
    <title>Document</title>
</head>
<body>
    <div class="box"></div>
    <script src="https://libs.baidu.com/jquery/1.11.3/jquery.min.js"></script>
    <script type="text/javascript">
        $.ajax({
            url: "test.json", //json文件位置
            type: "get", //请求方式为get
            dataType: "json", //返回数据格式为json
            success: function(ret) { //请求成功完成后要执行的方法
                var str = '';
                for (var i in ret.data) {//使用for in遍历数据
                   str += '<div>'+ret.data[i].id+'、昵称:'+ret.data[i].nick+'</div>';
                }
                $('.box').html(str);

            }
        })
    </script>
</body>
</html>
遍历数据也可以使用$.each方法遍历
var str = '';
$.each(ret.data, function(i,item) {
   str += '<div>'+item.id+'、昵称:'+item.nick+'</div>';
})
$('.box').html(str);
如果是获取一条数据,不用循环的,可以直接获取,比如ret.data.ip,或者也可以用$.parseJSON获取
{"code":"200","msg":"success","data":{"ip":"220.181.38.148","city":"北京市","area":"电信互联网数据中心"}}
代码:
var strJson = JSON.stringify(ret);
var data = $.parseJSON(strJson);
var str = '<div><span>'+data.data.city+'</span> <span>'+data.data.area+'</span><br><span>'+data.data.ip+'</span></div>';
$('.box').html(str);
效果如下:
axios 是一个基于Promise 用于浏览器和 nodejs 的 HTTP 客户端
1、 从浏览器制作XMLHttpRequests
2、 让HTTP从node.js的请求
3、 支持Promise API
4、 拦截请求和响应
5、 转换请求和响应数据
6、 取消请求
7、 自动转换为JSON数据
8、 客户端支持防止XSRF
axios请求本地json
相关依赖
安装
1:npm安装
npm install axios --save
2.在main.js下引用axios
import axios from 'axios'
一切环境依赖搭建好之后
下面来写个例子:axios请求本地json
1:在static文件夹底下新建json文件,( 本地JSON文件一定要需放在static文件夹之下。)
访问服务器文件,应该把 json文件放在最外层的static文件夹,这个文件夹是vue-cli内置服务器向外暴露的静态文件夹
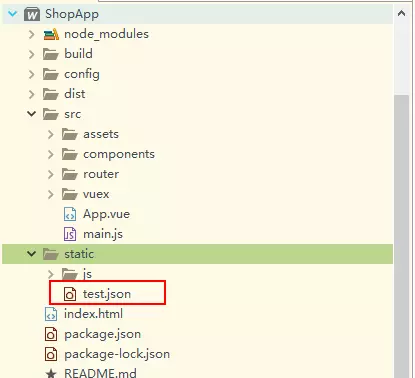
2:test.json数据格式如下:
{
    "data":[
        {"id":"1","nick":"濮阳南风"},
        {"id":"2","nick":"茅云蔚"},
        {"id":"3","nick":"箕建"},
        {"id":"4","nick":"表振"},
        {"id":"5","nick":"鞠腾骏"}
    ]
}
3:写一个axios
getData() {

                axios.get('../../static/test.json').then(response => {

                    console.log(response.data);

                }, response => {
                    console.log("error");
                });
            }
4:整体代码如下:
<template>
    <div id="app">

    </div>
</template>

<script>
    import axios from "axios";

    export default {
        name: "app",
        data() {
            return {
                itemList: []
            }
        },
        mounted() {
            this.getData();
        },
        methods: {
            getData() {

                axios.get('../../static/test.json').then(response => {

                    console.log(response.data);

                }, response => {
                    console.log("error");
                });
            }
        }
    }
</script>
5:然后在console控制台可以看到显示。
区别总结
axios是通过promise实现对ajax技术的一种封装,就像jQuery实现ajax封装一样。
简单来说: ajax技术实现了网页的局部数据刷新,axios实现了对ajax的封装。
axios是ajax ajax不止axios
]]>首先安装node
下载地址:https://nodejs.org/zh-cn/
然后安装vue-cli脚手架
npm install -g vue-cli
vue-cli项目
第一步创建名为 zhizun的项目
~~.....
$ vue init webpack zhizun
项目回答
Project name:项目名称
Project description:项目描述
Author:作者
Runtime-only:构建方式,分为独立构建和运行构建,默认选择 standalone
vue-router:是否安装路由
ESLint: ESLint规范,有标准的缩进、空格等规范 可以选 N

Set up unit tests: N
Setup e2e tests with Nightwatch: N
完成后,执行
进入到项目文件里
$ cd zhizun
本地服务器运行,出来一个测试地址
$ npm run dev
····································································
安装cnpm淘宝镜像
npm install -g cnpm --registry=https://registry.npm.taobao.org
安装 ui 框架
$ cnpm install element-ui -S
使用方式
在入口文件 main.js中引入
import Element from 'element-ui'
import 'element-ui/lib/theme-chalk/index.css';

Vue.use(Element)
····································································
需要打包stylus
$ cnpm install stylus stylus-loader -S
打包css文件
$ cnpm install css-loader style-loader -S
需要打包scss
$ cnpm install node-sass sass-loader -S
需要打包less
$ cnpm install less less-loader -S
····································································
安装 axios
cnpm install axios -S
1、全局使用方式
使用方式,在入口文件main.js中添加
import axios from 'axios'

Vue.prototype.$axios = axios
操作写法:
this.$axios.get('/api/index.json')
    .then(res => {
      console.log(res)
    })
    .catch(err => {
      console.log(err)
    })
在 config/index.js 中添加
proxyTable: {
  '/api': {
    target: 'http://localhost:8080',
    pathRewrite: {
      '^/api': '/static/data'
    }
  }
}
在 .gitignore 文件中,再添加 【不被webpack打包】
static/data

yarn-error.log* static/data # Editor
2、局部使用方式
哪个页面需要就添加到哪里
import axios from 'axios'
····································································
组件如何使用
1、引入组件
import header from '@/pages/common/Header'
2、组件注册
 data () {

  },
  components: {
    header
  }
3、组件渲染在页面,在页面的中写入
<header></header>
父子组件传值:
父组件
<home-header :lists="headerData"></home-header>

data () {
    return {
        headerData: []
    }
}
子组件接受:
props: {
    list: Array
}
或者是:
prop: ["list"]
传方法:
父组件
<home-header :open="handelClick()"></home-header>

methods: {
    handelClick (可接受一个来自子组件的值) {
        console.log("hahaha")
    }
}
子组件:
<button @click="getData()"></button>
   methods: {
        getData () {
            this.$emit("open",可传一个值到父组件)
        }

}
最后的最后测试完成后打包上线
$ npm run build
生成一个dist文件,里面的文件+api文件 就可直接上传到服务器
····································································
1、安装cnpm
npm install -g cnpm --registry=http://registry.npm.taobao.org
2、安装webpack
cnpm install webpack -g
3、安装vue-cli
cnpm install vue-cli -g
以上有安装过的,可以直接执行以下命令
4、cd /项目名称
cd zhizun
5、npm install
cnpm install
6、npm run dev
cnpm run dev
npm ERR! missing script: dev
执行cnpm run serve
如果不行就输入vue init webpack初始化将package.json中丢失的修复,然后cnpm intall安装依赖,最后cnpm run dev即可!
npm ERR! path
将no such file 或者 directory,access中指明的文件路径中的node_modules删除,然后再重新cnpm intall
Module build failed:BrowserslistError:
删除.browserslistrc文件就好了
npm ERR! code ELIFECYCLE
cnpm cache clean --force
rm -rf node_modules //删除指定文件或文件夹
rm -rf package-lock.json
cnpm install
cnpm install 成功之后再次启动 cnpm start